School dinners. They get a lot of bad press but I have very fond memories of my primary school meals.
My favourites were mince beef and onion pie (make sure you get the corner bit), homemade crisps, chocolate sponge with pink custard and semolina with jam. I think that last one might just be me.
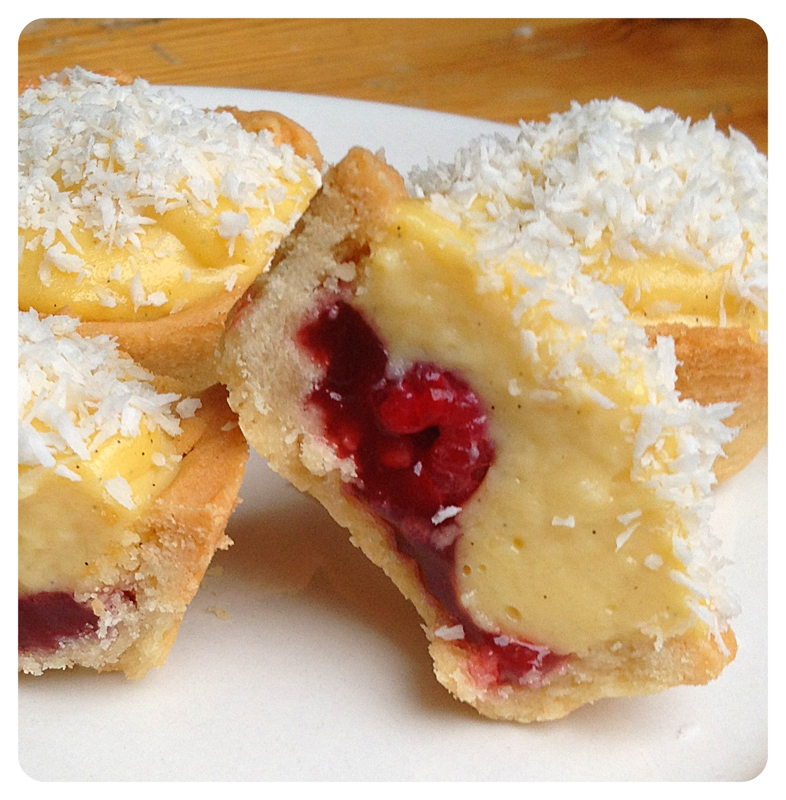
But most of all what I hoped for was Manchester Tart. Well, at that time I didn't know that was what it was called, it was just jam and custard tart. It took another 30 years before I realised it had a proper name. I'd wanted to make it since then, but could it live up to the version at St Bartholomew's Primary School that the 8 year old me enjoyed so much?
These turned out even better than I remembered. I used creme patisserie to give a lightness and added some fresh raspberries to add a tang against the sweetness.
The pastry needs to be crisp, so use sweet pastry and don't roll it too thick. On the other hand, don't roll it too thin or it won't be strong enough to hold the contents. I used shop bought but if you've got the time (and the inclination) feel free to make your own.
Ingredients:
375g ready made sweet pastry
4 tbsp seedless raspberry jam
125g fresh raspberries
4 egg yolks
100g golden caster sugar
25g plain flour
1 vanilla pod
350ml whole milk
Desicated coconut
How to make them:
1. Remove the pastry from the fridge 30 mins before you start.
2. Pre-heat the oven to 180C/gas 4.
3. Grease a 12-hole muffin tin with butter.
4. Roll the pastry out to about 3mm and cut out 12 rounds using a cutter a bit bigger than the hole in the tin (you might need a bit of trial and error here).
5. Put the pastry carefully into the holes - if you get any tears make sure you patch them with a bit of extra pastry.
6. To blind bake the pastry cases, tear off a small square of foil, fill with rice and place into the centre of each tart.
7. Bake for 8mins with the foil parcels, then remove from the oven.
8. Take out the foil carefully - if any of the pastry has managed to puff out too much, squish it with the end of a knife. It doesn't look that pretty but no one's going to see it and it'll taste just fine!
9. Return to the oven for 2-4mins until the pastry is light golden.
10. Take the tin out of the oven and allow to cool while you make the creme patisserie.
11. Whisk the egg yolk and sugar in a bowl until pale and creamy, then stir in the flour.
12. Put the milk in a saucepan. Slit down the length of the vanilla pod and scrape out the seeds with the point of the knife. Add the seeds and pod to the milk and bring slowly just to boiling point.
12. Take the vanilla pod out of the milk then pour it slowly on to the egg/sugar mixture, stiring constantly with a balloon whisk.
13. Once the two are combined, put the new mixture back into the saucepan and bring back to the boil stirring gently with the whisk to stop it going lumpy. Let it boil for a few minutes, stirring until it thickens.
14. Remove from the heat and pour into a bowl or jug to cool slightly. Make sure you cover the whole surface of the custard with cling film immediately so that a skin doesn't form while it cools.
15. Put a teaspoon of jam into the bottom of the cooled pastry cases and carefully spread it out. Put two raspberries onto the jam, pointy end up.
16. Spoon 3-4 tsps of the creme patisserie to fill the tart. You can get more in if you allow the first couple to set slightly before you go round again to add the rest.
17. Before the top sets too much, sprinkle liberally with the coconut.
18. Put in the fridge for at least 40mins to set. They'll last 2-3 days if they're kept in the fridge, before the pastry starts to lose its crispness.
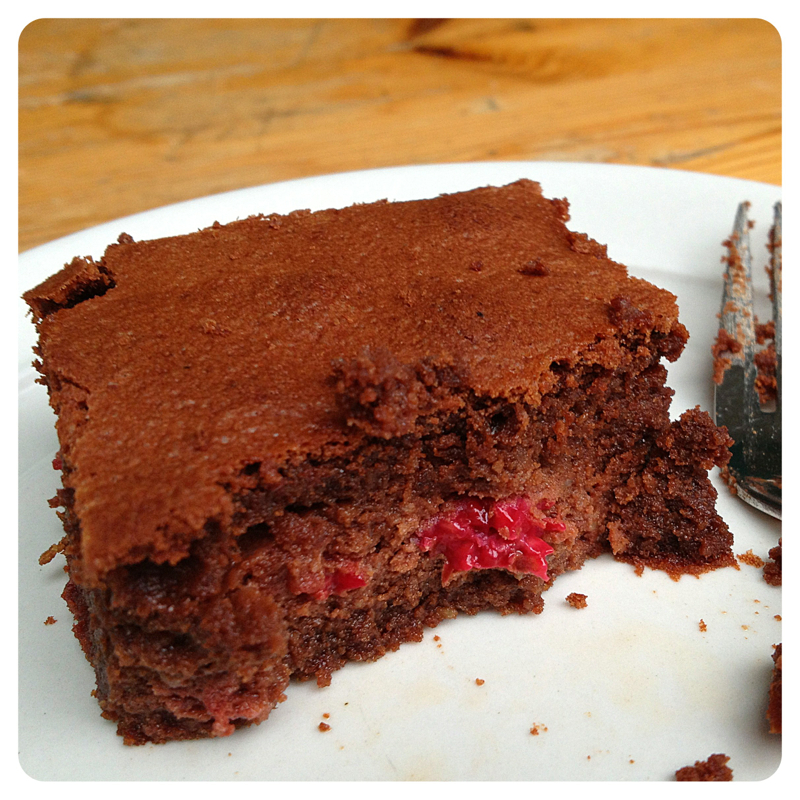
These were made for Paula's birthday as she once told me that, like me, she loves the combination of chocolate and cherry (and she's quite fond of a little bit of alcohol). So I've happily named them after her.
Don't be put off by the slightly unusual method - it's actually very easy to do. There's no flour, or any of the usual substitutes you'd find such as ground almonds, but you will need a whole lot of eggs. The texture is dense and incredibly chocolatey - it's a bit like a baked chocolate mousse.
If you don't fancy cherries, you could soak some sultanas in rum instead, or use hazelnuts for a bit of crunch.
Ingredients:
300g dried cherries
Cherry brandy (or vodka)
8 medium egg whites
4 medium egg yolks
80g caster sugar
250g dark chocolate (70% cocoa)
60g unsalted butter
75g Milky Bar
How to make it:
1. Put the cherries in a dish and pour over just enough alcohol to cover them. Cover the dish with cling film and leave overnight.
2. Preheat the oven to 180°C/Gas 4.
3. Grease a traybake tin with butter, then line with greaseproof paper.
4. Place the egg whites in a large clean bowl (any grease at all will stop the whites whisking properly) and add half the caster sugar. Using an electric whisk, whisk until they form stiff peaks and then set aside.
5. Bring a medium-sized saucepan of water to simmering point, and place a large bowl over the pan so the base of the bowl doesn't touch the water below. Put the egg yolks and the remaining caster sugar into the bowl and whisk until you reach the ribbon stage (forming thick ‘ribbons’ that fall off a spoon). Remove the bowl and put to one side.
6. Break the chocolate into pieces and put into a bowl with the butter. Microwave for up to 2mins until everything is melted, stopping about every 30 secs to stir.
7. Take the egg yolk mixture and stir in the melted chocolate and butter, then fold in the whisked egg whites and the cherries.
8. Pour the mixture into the lined baking tin and place in the oven for about 12mins. Test with a cocktail stick - there should still be a bit of mixture sticking to it as you don't want it to be dry.
9. Allow the cake to cool completely in the tin while you melt the Milky Bar in the microwave in the same way as before.
10. When the cake is cool, use a teaspoon to drizzle the chocolate over the top of the cake. Allow it to set before you slice the cake into squares (you can put it in the fridge if you want to speed up the process).
Adapted from 'Cookery School' by Richard Corrigan
Easter is second only to Christmas as a licence to overindulge - hot cross buns for breakfast? Why not. Two Cadbury's Creme Eggs? Don't mind if I do. Oh maybe that's just me.
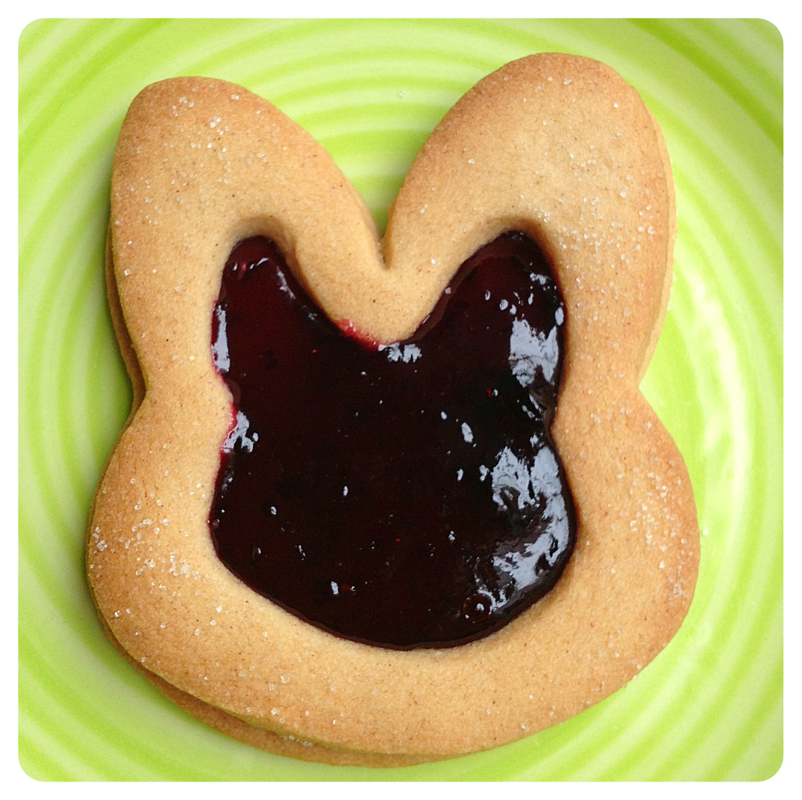
I made these bunny head biscuits for Easter but they'd be delicious jammy dodgers anytime of year if you use different cutters. The cinnamon is quite subtle and the blackcurrant jam is both sharp and sweet. You can obviously use any flavour of jam if you've got a favourite.
The important thing is to have two biscuit cutters of different sizes. The closer in size they are, the bigger the hole to fill with jam will be. They don't have to be the same shape, but you can often buy sets of one shape in several sizes which make it easy - the ones I used here were from Sainsbury's.
Ingredients:
175g plain flour
Pinch of salt
1 tsp cinnamon
75g icing sugar
125g unsalted butter in small pieces
1 egg yolk
1 tsp vanilla extract
Blackcurrant jam
How to make them: 1. Put the flour, salt, cinnamon and icing sugar in a bowl. 2. Rub the butter lightly into the flour with your fingertips, until it looks like fine breadcrumbs. 3. Make a well in the centre of the flour and add the egg and vanilla. Mix together with a knife, then knead together gently to form a soft, smooth dough. 4. Wrap the dough in cling film and chill in the fridge for 30 mins. 5. Preheat the oven to 170C/Gas 3. 6. Roll the dough out to around 4mm. 7. Cut out an equal number of biscuits using the larger cutter and put them on baking sheets lined with grease proof paper. Make sure you do that before you cut out the centres or they'll be too fragile to move. 8. Then with half of the biscuits cut out the centre using the smaller cutter (you can re-roll the cut out bit). 9. Bake for 10mins until just starting to colour. 10. While they are still hot from the oven put a teaspoon of jam in the middle of each of the whole biscuits. 11. Spread it out carefully almost to the edge of the biscuit with the back of the teaspoon. You only need a thin layer of the jam to stick the biscuits together but not too much that it will ooze out of the sides. Try to keep all of the fruity bits in the middle where the hole will be or the top won't sandwich together properly. 12. Sprinkle the cut out biscuits with a fine dusting of castor sugar then carefully put each one on top of a whole biscuit. Add another teaspoon of jam into each hole to fill it with jam. 13. Put them back in the oven and cook for another 5mins until the biscuits are golden all over and the jam has set. 14. Remove from the oven and let them cool for 5 mins on the baking sheet before moving to a cooling rack.
Cardamom (Elaichi in Hindi) is the third most expensive spice by weight [after saffron and vanilla], but luckily a little goes a long way and gives a beautiful perfume to chilli, curries, biscuits and all manner of good things.
It can be quite a tricky balance to get the cardamom levels right in this recipe - too little and you might as well not bother, too much and it’s like eating a bar of soap [as I found out when the first batch ended up in the bin and husband described the second as ‘strange’]. The strength can be affected by how old your pods are – if they’ve started to lose their bright green colour, it’s definitely time to bin them and get a new batch.
If you’re not sure how strong you want it, I’d add half the ground cardamom to the chocolate mixture, taste, then decide if you want to add the rest; you don’t want it to overpower the other flavours. And don’t be tempted to substitute black cardamom, as the more woody flavour wouldn’t be right here.
I’ve listed the recipe with raspberries, but I’ve also made it with blackberries. I prefer the raspberries, as the flavour stands out more against the chocolate and cardamom but they do tend to be juicer, which makes the texture wetter. The blackberries give a more cake like texture but are a softer fruity note. You could of course leave the fruit out completely - substitute the cardamom for some ground ginger or just go for a pure chocolate hit.
Ingredients:
150g 70% dark chocolate
150g salted butter
6 medium eggs
250g golden caster sugar
100g ground almond
4 tsp cocoa powder
½ tsp vanilla extract
2-3 green cardamom
300g raspberries
How to make it:
1. Pre-heat the oven to 180°C/Gas 4, and line a traybake tin with grease proof paper.
2. Remove the cardamom seeds from their pods and grind to a fine powder. I've got a Jamie Oliver Flavour Shaker which I find invaluable for small amounts of spice but you could use a pestle and mortar.
3. Melt the chocolate and butter together in the microwave for about 1min 40secs, stopping every 30secs to stir. Eventually the remaining chocolate will melt in the residual heat of the liquid.
4. Add the ground cardamom and vanilla extract to the chocolate mix, then set aside to cool.
5. Beat the eggs and sugar together with a hand whisk or mixer until very fluffy and pale.
6. Mix the ground almonds with the cocoa powder and beat into the egg and sugar mixture.
7. Briefly beat the chocolate mixture into the mix.
8. Carefully fold in the raspberries with a spatula or big metal spoon.
9. Pour the batter into the tin and bake for 35-40 minutes. The cake will be set on the top and have a bit of jiggle below. It does have a tendency to catch, so if that starts to happen, cover it lightly with some scrunched up greaseproof paper.
10. Remove from the oven and leave in the tin on a wire rack to cool.
11. Make sure it's completely cool before you try to slice it - the top will still crack a bit anyway but you should stop the underneath from crumbling.
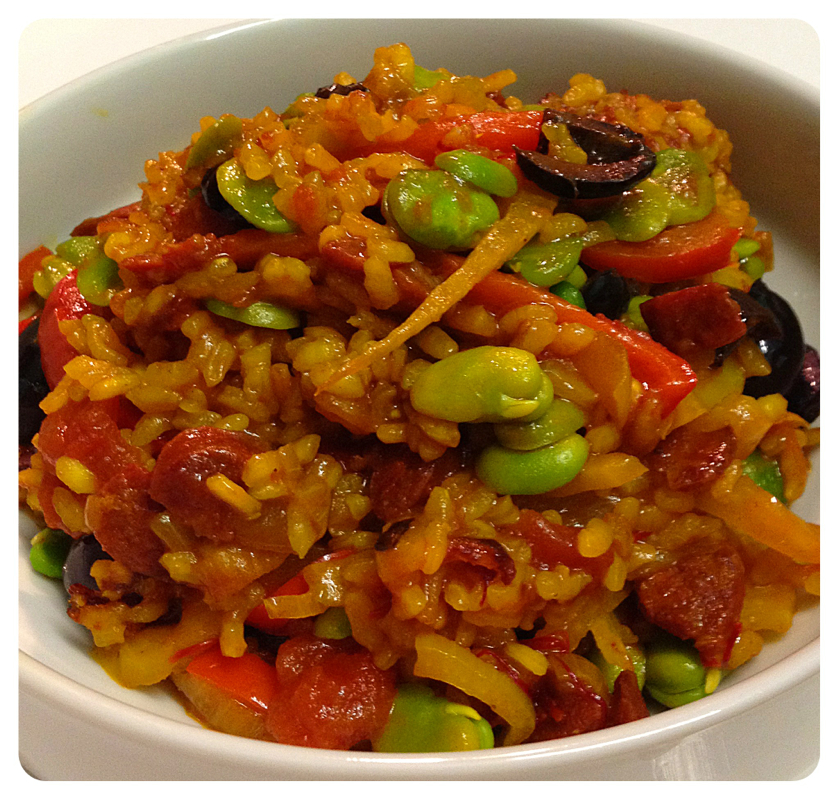
In 6 weeks we're off to Barcelona for a long weekend. It's over 10 years since I was there and my husband has never been. I can't think of anywhere more perfect for the two of us though and I suspect a large percentage of our time there will involve sherry, chorizo, jamon Iberico and churros.
To get us in the mood I thought I'd try making a paella. Neither of us are big fans of seafood, so the challenge was to find a recipe that would avoid that, but still have lots of flavour.
Not a problem, as I already had my eye on a vegetable paella recipe from Yotem Ottlenghi's Plenty which I could adapt. Along with a few other tweaks, I left out some of the veg and added chorizo. Obviously it's no longer a vegetarian dish but the vegetables are still the main flavour, with the chorizo accenting them. You can easily use the recipe as a base and add veg, meat or seafood of your choice.
It did initially take longer to cook than I expected but I then realised that having the hob on a very low heat meant that the stock wasn't hot enough to make the rice absorb it. Live and learn.
Yes, skinning the broad beans is a faff but it really is worth it. The more I did, the quicker I got and the better my technique. I won't lie though, a few did shoot across the room, for which the dog was very grateful!
Ingredients:
3 tbsp olive oil
100g chorizo diced small
1 small white onion, finely chopped
1 red and 1 yellow pepper cut into strips
1 small fennel bulb, cut into strips
2 bay leaves
¼ tsp smoked paprika
½ tsp turmeric
A pinch of cayenne
150g paella rice
100ml sherry
½ tsp saffron strands
400ml warm vegetable stock
½ sea salt
200ml chopped tomatoes
200g frozen broad beans
15 pitted Kalamata olives, halved
How to make it:
1. Heat the oil in a pan and fry the chorizo until it starts to crisp, then remove from the pan.
2. Add the onion to the same pan and fry for about 5 mins until it turns translucent.
3. Add the peppers and fennel and fry for about 6 mins more, making sure that the fennel has softened and started to turn brown.
4. Add the bay leaves, paprika, turmeric and cayenne to the vegetables and mix thoroughly for a minute.
5. Add the rice and stir for two minutes, making sure that all the rice has taken on the oil and flavours in the pan.
6. Add the saffron to the sherry, then add both to the pan. Let it boil for a minute then add the tomato.
7. Add the stock, salt and chorizo and turn down to a medium to low heat.
8. Let it cook for 20mins without stiring or covering.
9. While it's cooking, put the broad beans in a bowl and cover with boiling water. Leave for one minute then drain the water and re-cover with more boiling water. Leave for 2-3 minutes, then squeeze the beans out of their skins.
10. Once most of the liquid has been absorbed, sprinkle the beans and olives on the top and allow to cook for a few more minutes.
11. Check that the rice is soft but not soggy - it's ready to serve.
Adapted from Plenty by Yotem Ottolenghi
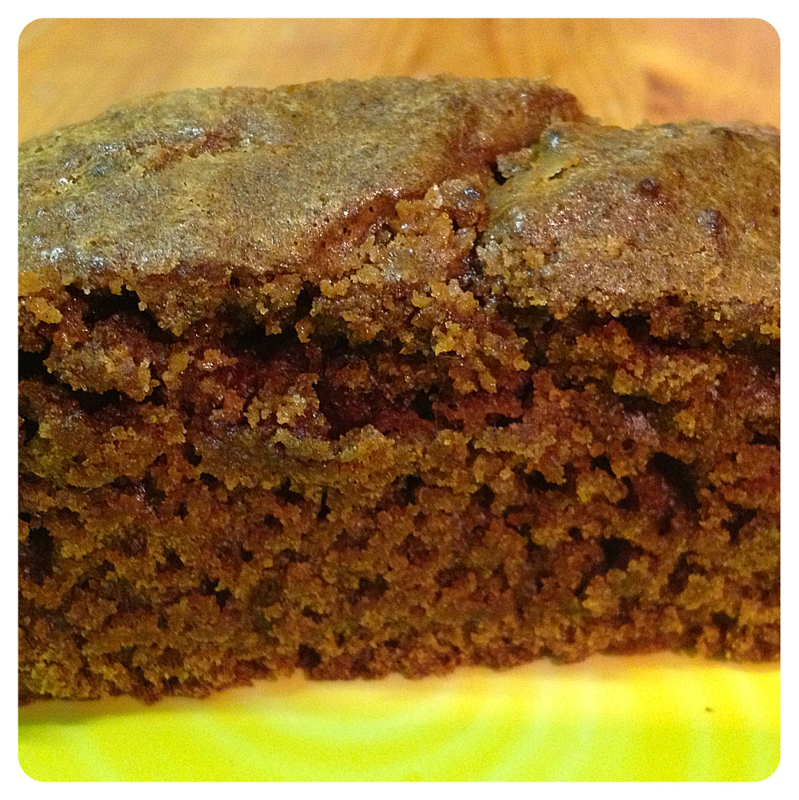
Quite often my hair smells of spice, particularly if it gets wet in the rain. There are very few days when spices aren't used in our house. We've filled two double spice racks and are now balancing extra jars on top. As I've been cooking a lot of Indian and Middle Eastern dishes lately, I've really enjoyed using some of the sweeter spices in savoury dishes - especially cinnamon, as it adds such a lovely softness against other spices. When I saw this recipe by Shelina Permalloo in the Sainsbury's magazine I knew it would go down a storm in our house. Muscavado sugar is one of my most favourite things (and also makes it into a lot of my savoury dishes). The full-on spice balances it out and stops the cake feeling too sweet. The original recipe uses the topping as a buttercream once the cake is cool but I prefer the method here which gives it a coating a bit like McVitie's Jamaican Ginger cake (yum). Oh and I added the rum, though you can leave that out if you prefer. My husband said it needed more rum but he'd always say that!
Ingredients:
175ml whole milk
2 tbsp ground ginger
1 tbsp ground nutmeg
1 tsp ground cinnamon
75g dark muscavado sugar
75g softened unsalted butter
75g black treacle
100g golden syrup
200g self-raising flour
1 tsp bicarbonate of soda
1 medium egg lightly beaten
For the topping:
35g very soft unsalted butter
55g dark muscavado sugar
25g icing sugar
½ tsp vanilla extract
2 tsp dark rum
How to make it: 1. Pre-heat the oven to 180C/Gas 4. 2. Grease and line a 20cmx9cm loaf tin with baking paper. 3. Put the milk, butter, spices, sugar, treacle and syrup in a saucepan and slowly bring to a simmer, until all the sugar is dissolved. 4. Sift the flour and bicarbonate of soda into a large mixing bowl. 5. Pour the wet mixture onto the dry ingredients and stir well. 6. Add the beaten egg and mix thoroughly. 7. Pour the mixture into the prepared loaf tin and bake for 30mins, or until a skewer comes out clean. 8. Put all the topping ingredients into a bowl and mix. 9. Once the cake is cooked, remove from the tin carefully and place on a cooling rack with some newspaper underneath (this can get messy!) 10. Use a cocktail stick to pierce 10-12 holes in the cake without going through the bottom. 11. Take spoonfuls of the topping and spread onto the cake while it's still hot. It will sink into the holes and form a thin crust on the cake. Use the spoon to make sure it covers the sides as well as the top. 12. Leave the cake to cool and the topping to set - if you can wait that long! Recipe adapted from Shelina Permalloo for Sainsbury's Magazine.
I love vegetables.
When my mum reads that statement it will make her laugh out loud, as I've spent most of my life hating vegetables and avoiding them as much as possible.
And actually I still don't love all vegetables - stalky nobbly broccoli is clearly the devil's work. Nothing would convince me to eat smelly watery cucumber. However, if you roast me some sweet parsnips or nutty Jerusalem artichokes I'm a happy girl.
We now probably eat vegetarian meals at least three times a week, and what has made the difference has been finding amazing recipes which put vegetables at the centre of the dish and are packed with great flavours and textures.
I have a little bit of an obsession with Yotam Ottolenghi and Sami Tamimi's books Plenty and Jerusalem. Though not vegetarians they create fabulous vegetables dishes that can easily be made at home.
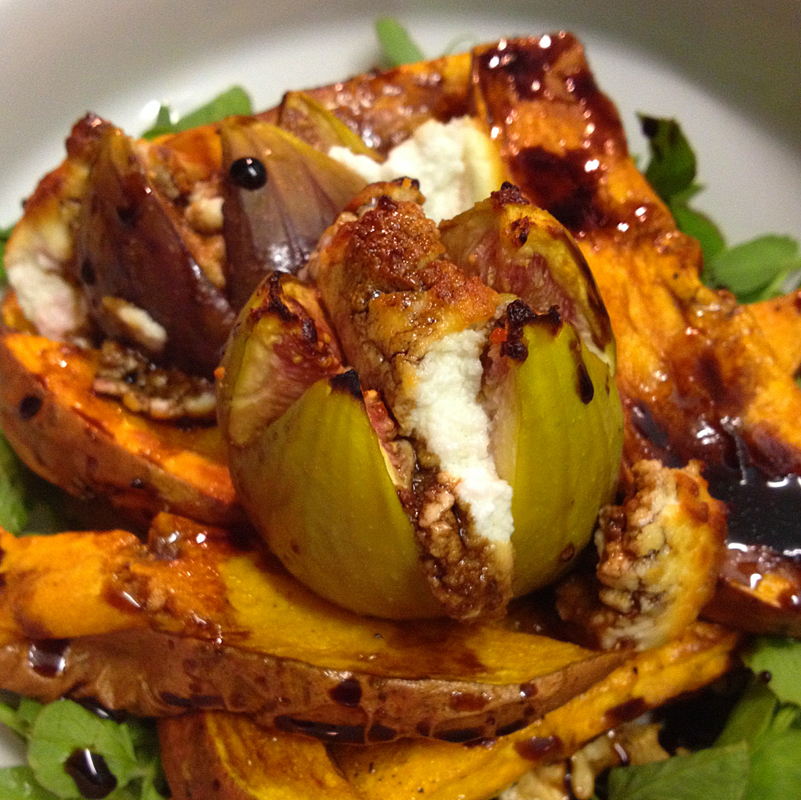
This recipe is adapted from a recipe in Jerusalem. I've added the peashoots/ walnuts and roasted the figs rather than served them fresh, but otherwise it's a great representation of the beautiful dishes in their books.
Ingredients:
2 sweet potatoes
2 tbsp olive oil
¼ chilli flakes
20g caster sugar
40ml balsamic vinegar
4 fresh and ripe figs
125g soft goat’s cheese
Sea salt and black pepper
A few handfuls of peashoots
A handful of roughly chopped walnuts
How to make it:
1. Preheat the oven to 240C/gas 9.
2. Wash the sweet potatoes, halve them lengthways and then cut each again similarly into three long wedges. Mix with the olive oil, the chilli flakes, a teaspoon of salt and some black pepper.
3. Cut a cross into the top of each fig, take a chunk of cheese and put it inside.
4. Spread the wedges out on a baking sheet, skin-side down, nestle the figs inbetween them and cook for about 25 minutes until soft but not mushy.
5. To make a balsamic reduction, place the balsamic vinegar and sugar in a small saucepan. Bring to a boil then reduce the heat and simmer for 2–4 minutes, or until it thickens. Be sure to remove the pan from the heat when the vinegar is still runnier than honey; it will continue to thicken as it cools.
6. Stir in a drop of water before serving if it does become too thick to drizzle.
7. Put the peashoots in the bottom of each dish and sprinkle with the walnuts.
8. Arrange the sweet potatoes and figs on top.
9. Drizzle over the balsamic reduction and crumble over some extra cheese if you'd like it.
Recipe adapted from Jerusalem by Yotam Ottolenghi and Sami Tamimi
My husband used to hate soup. He always found it too greasy, too salty, too thick ...
That is, until he started making it himself. Now he is a very fine soup maker and I often come home on a Thursday, after an evening in a freezing cold kitchen baking with the Swindon Young Carers, to a delicious freshly made soup and crusty bread.
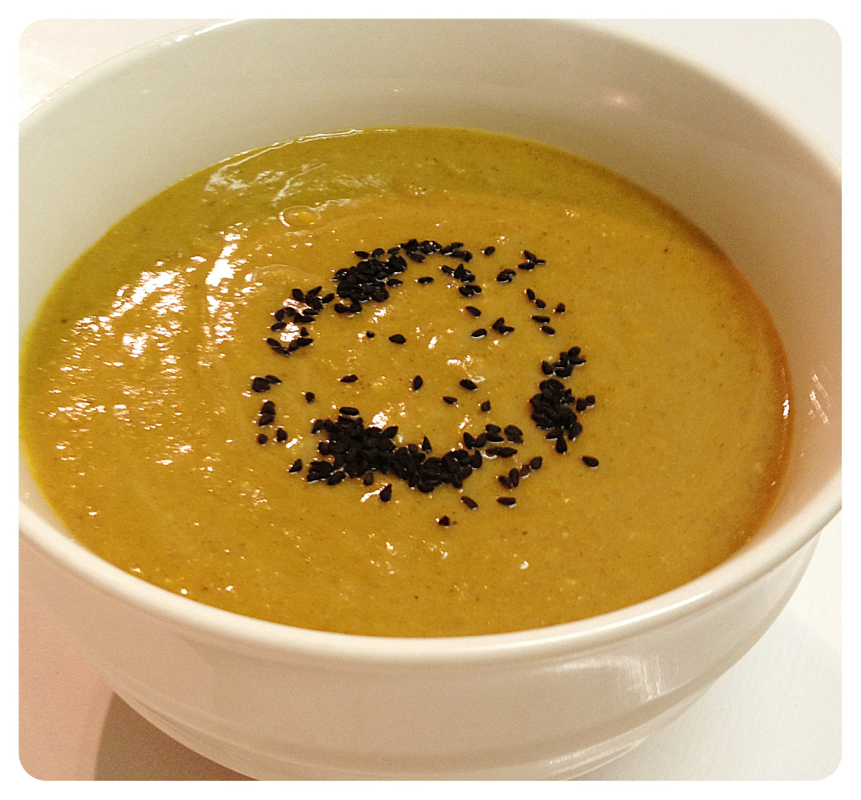
So I usually leave the soup to him, but I wanted to have a go myself. I think it's worth the bit of extra time to roast the butternut squash and get that really sweet flavour. It's quite heavily spiced but without too much heat, so that the flavour of the squash still comes through.
I wanted this to be as well spiced as a curry would be, and if you wanted, you could leave out the stock, ditch the blending and simply stir through the chunks of roast squash at the end for a gorgeous veg curry.
Ingredients:
640g butternut squash
4 shallots
½ tsp garlic paste
2 tsp ginger paste
½ tsp cayenne pepper
2 tsp ground coriander
2 tsp ground cumin
2½ tsp garam masala
1 tsp cinnamon
½ ground fenugreek
100g red lentil
500ml vegtable stock
400ml reduced fat coconut milk
1 tsp tamarind paste
1 tsp brown sugar
½ tsp salt
½ tsp ground black pepper
2 tsp nigella seeds
How to make it:
1. Pre-heat the oven to 160C/gas 3.
2. Cut the squash into large chunks and peel (or better still buy it pre-prepared).
3. In a bowl, drizzle the squash with a tbsp of oil and mix to make sure all the squash is coated. Spread out on a baking tray covered with grease proof paper and put in the oven for an hour and 15 mins.
4. Chop the shallots roughly and fry for a few minutes until they start to soften.
5. Add the garlic and ginger pastes and all the spices. Fry on a medium to high heat for a few minutes. Don't let the spices burn, if you think they might, add a few tbsp of warm water.
6. Add the lentils and stir into the spice and shallot mixture for minute.
7. Add the stock and coconut milk and stir thoroughly.
8. Add the tamarind paste, brown sugar, salt and pepper.
9. Bring to the boil, then reduce to a low heat. Allow it to simmer for 10 minutes.
10. Remove the squash from the oven and add to the pan.
11. Remove from the heat and use a stick blender to blend to a very smooth texture. If it seems a bit too thick, add some warm water.
12. Return the pan to the heat and warm through.
13. Serve topped with a tsp of nigella seeds to add some earthiness and some buttered naan.
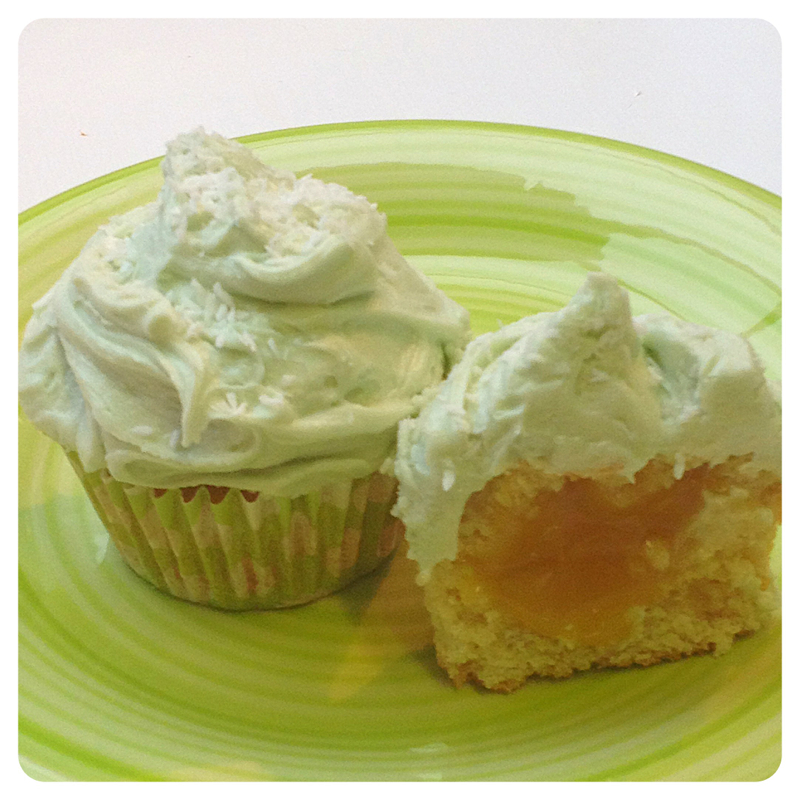
If you love Twitter and you love baking then you must love @SundayBakeClub.
The other week the theme was cupcakes and all over the country flour, sugar, butter and eggs were turned into sweet delights and the evidence posted on Twitter.
Husband spent the afternoon in front of boy telly while I spent the afternoon creating these little beauties. There is almost nothing I love more than coconut. They give you just a hint of it, followed by a big kiss of lime curd. The recipe makes 12 but they're only at their best for about 3 days, so unfortunately you have to eat them fairly quickly (not a problem in our house).
Give them a go - or even better find out what the theme is this week and join the club!
Ingredients:
110g unsalted butter, at room temp
225g golden caster sugar
2 large eggs
150g self-raising flour, sifted
125g plain flour, sifted
120ml semi-skimmed milk, at room temp
1tsp vanilla extract
A jar of lime curd
110g unsalted butter, at room temp
A splash of semi-skimmed milk
500g icing sugar
Green food colouring
5 tbsp dessicated coconut
How to make it:
1. Preheat the oven to 180C/gas 4 and line a 12-hole muffin tray with cupcake cases.
2. Cream the butter and sugar until the mixture is pale and smooth. Add the eggs, one at a time, mixing for a few minutes after each addition.
3. In a separate bowl, combine the two flours. Put the milk into a jug and add the vanilla extract.
4. Add one third of the flour to the creamed mixture and beat well. Pour in one third of the milk and beat again. Repeat these steps until all the flour and milk have been added.
5. Spoon the mixture into the cupcake cases, filling them to about two thirds full. Bake in the oven for about 25 minutes until slightly raised and golden brown. To check they are cooked, insert a skewer in the centre of one of the cakes - it should come out clean.
6. Remove from the oven and leave on a wire rack to cool.
7. Once totally cool, make a small circle in the top of each cake with a small sharp knife. Lift the circle of sponge out and keep to one side.
8. Use a teaspoon to scoop out a bit deeper, then fill the hole with a teaspoon of lime curd. Replace the circle of sponge.
9. In a large mixing bowl, beat the butter, vanilla extract, 3 dessert spoons of lime curd and half the icing sugar until smooth.
10. Gradually add the rest of the icing sugar and beat until the buttercream is smooth and creamy. If it's too soft add a little more icing sugar, if it's too stiff add splashes of milk.
11. Add a few drops of the green colouring and beat. Keep adding drops until you get the colour you want. I went quite pastel but go full on Kermit if you like.
12. Dollop a dessert spoon of the buttercream into the middle of the cupcake.
13. Use the back of the spoon to swirl the icing out to the sides of the cake.
14. Sprinkle liberally with the coconut before the icing sets.
Recipe from The Primrose Bakery
Snow. Everything comes to a stand still. On Friday I couldn't even get my car out of my street - I live in town centre, but no gritting meant that it was sliding about all over the place. So in the end I left it on some double yellow lines before I hit something.
The other feature of snow is panic buying food as if the apocalypse is coming. Luckily I don't need a car to get to a supermarket, just a 10 minute trudge through the snow.
To be honest, we probably could survive for some time on what we have in the house. There are some things I like to have at all times 'just in case'. These include feta, pancetta, roasted red peppers, chorizo, eggs and sweetcorn.
The last two helped create a perfect brunch before we took the dog to the park to play in the snow. I like mine quite sweet, so I added the maple syrup but you could leave that off and top with a runny poached egg instead.
Ingredients:
50g self-raising flour
1 tsp nigella seeds
2 tsp dried thyme
2 pinches ground cinnamon
½ tsp salt
A few grind of black pepper
1 whole egg plus an extra egg white
1 tbsp milk (if needed)
340g tin of sweetcorn
6 rashers of bacon
Maple syrup
How to make it:
1. Put the bacon on to grill.
2. Put the flour, nigella, thyme, cinnamon, salt and pepper in a bowl.
3. Add the egg and egg white, then whisk. Check the texture, it should be loose and smooth - if it isn't, add the milk and whisk again.
4. Add the sweetcorn and mix so that all the corn is coated.
5. Heat a few generous slugs of oil in a frying pan.
6. When it's nice and hot, take a tablespoon of the fritter mix and add to the hot pan. You should be able to get four into a pan.
7. Don't be tempted to poke it, let it cook for a few minutes so the base seals. If you take the pan off the heat and shake vigorously, they should slide about - that's the time to flip them.
8. Cook until both slides are golden and slightly crisp.
9. Take the bacon out of the grill and blot with kitchen towel to get rid of excess fat.
10. Pile the fritters into a stack, top with the bacon and drizzle liberally with maple syrup.
|


 RSS Feed